Introduction
A Pegboard Wall Organizer is one of the most practical, affordable, and versatile DIY storage solutions you can add to your home. Whether you live in a small apartment, manage a busy household, or simply want a clutter-free workspace, a pegboard wall organizer helps you maximize vertical space while keeping everything visible and easy to reach.
In recent years, these wall organizers have become extremely popular in home organization, DIY, and interior décor trends. From minimalist home offices to fully equipped garages, pegboards offer endless customization possibilities. The best part? You don’t need professional skills to build one yourself.
In this complete guide, you’ll learn exactly how to build your own Organizer—from choosing the right materials to installation, customization ideas, budget tips, and maintenance advice. By the end of this post, you’ll be confident enough to create a pegboard wall organizer that perfectly fits your space and lifestyle.
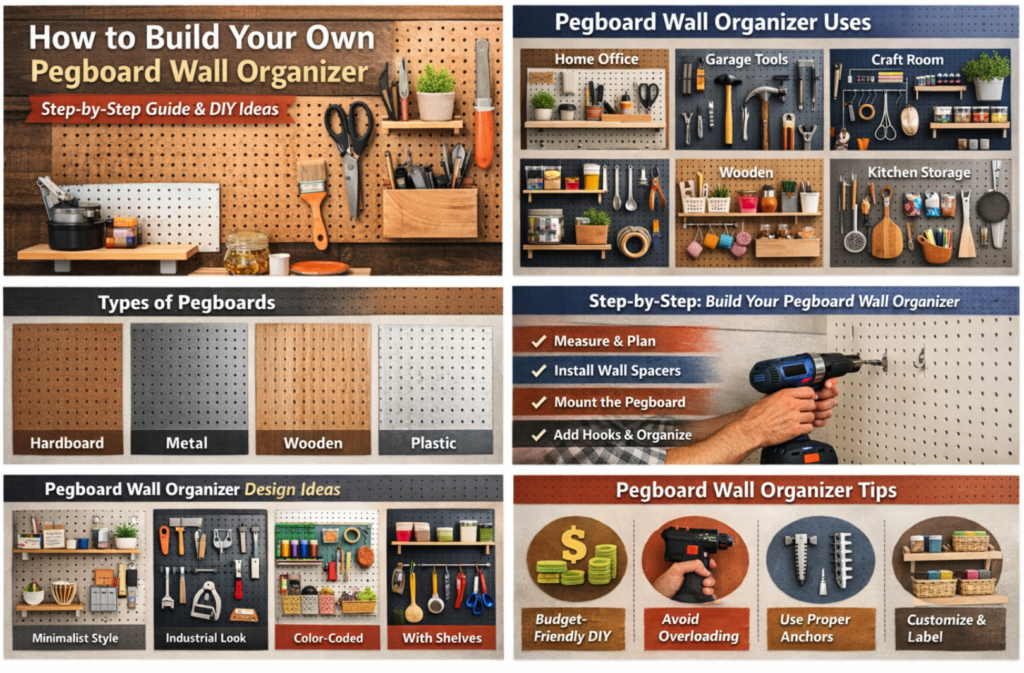
What Is a Pegboard Wall Organizer?
these kind of Wall Organizer is a wall-mounted board with evenly spaced holes that allow hooks, pegs, baskets, and shelves to be inserted. These accessories hold items such as tools, kitchen utensils, office supplies, craft materials, and more.
The key advantage of a pegboard wall organizer is flexibility. Unlike fixed shelves or cabinets, you can rearrange hooks anytime without drilling new holes. This makes pegboards ideal for changing storage needs and evolving spaces. if you are looking for DIY Closet Organizer on a Budget we have a detail overview.
Benefits of a Pegboard Wall Organizer
1. Maximizes Vertical Space
A pegboard wall organizer uses wall space efficiently, which is especially helpful in small homes or apartments. Instead of cluttering countertops or floors, you can store items vertically.
2. Fully Customizable Storage
One of the biggest advantages of a pegboard wall organizer is customization. You can move hooks, add shelves, or rearrange items whenever needed.
3. Budget-Friendly Solution
Compared to cabinets and shelving units, pegboard wall organizers are very affordable. Even a large pegboard setup can be completed on a small budget.
4. Improves Organization and Productivity
When everything is visible and within reach, you save time and reduce frustration. A well-organized pegboard wall organizer makes daily tasks easier.
5. Works in Any Room
From kitchens and offices to garages and kids’ rooms, a pegboard wall organizer adapts to any space.
Best Places to Use a Pegboard Wall Organizer
Home Office
Use a pegboard wall organizer to store stationery, cables, headphones, and planners. It keeps your desk clean and boosts productivity.
Garage or Workshop
A pegboard wall organizer is perfect for organizing tools like hammers, screwdrivers, wrenches, and power tools.
Kitchen
Hang utensils, pans, spice racks, and small baskets using a pegboard wall organizer to free up cabinet space.
Craft or DIY Room
Crafters love pegboard wall organizers for storing scissors, paints, ribbons, and supplies.
Kids’ Study Area
A pegboard wall organizer can hold school bags, books, art supplies, and accessories while teaching kids organization skills.
Types of Pegboards for Wall Organizers
Hardboard Pegboards
These are the most common and affordable pegboards. They are lightweight and suitable for light to medium loads.
Metal Pegboards
Metal pegboard wall organizers are durable and modern-looking. They can hold heavier items and last longer.
Plastic Pegboards
Plastic pegboards are moisture-resistant, making them ideal for kitchens and bathrooms.
Wooden Pegboards
A wooden pegboard wall organizer offers a premium, aesthetic look and blends well with modern interiors.
Tools and Materials Needed
To build a Pegboard Wall Organizer, you will need:
- Pegboard panel
- Wall spacers or wooden furring strips
- Screws and wall anchors
- Pegboard hooks and accessories
- Measuring tape
- Drill machine
- Level
- Pencil
- Optional: Paint, primer, baskets, shelves
Step-by-Step Guide: How to Build Your Own Pegboard Wall Organizer
Step 1: Measure and Plan
Measure the wall space where you want to install the pegboard wall organizer. Decide the size and layout based on your storage needs.
Step 2: Prepare the Wall
Clean the wall and mark drilling points using a pencil and level. Proper marking ensures a straight and secure installation.
Step 3: Install Wall Spacers
Wall spacers are essential for a pegboard wall organizer. They create space between the wall and the pegboard so hooks can fit properly.
Step 4: Mount the Pegboard
Align the pegboard with spacers and secure it using screws and anchors. Make sure it is firmly attached.
Step 5: Add Hooks and Accessories
Insert hooks, baskets, and shelves into the pegboard wall organizer. Arrange items based on frequency of use.
How to Customize Your Pegboard Wall Organizer
Customization turns a simple pegboard wall organizer into a stylish décor element.
- Paint the pegboard to match your room
- Use color-coded hooks
- Add small shelves for décor items
- Label sections for easy identification
- Create zones for specific items
Pegboard Wall Organizer Design Ideas
Minimalist Style
Neutral colors, clean lines, and fewer accessories create a modern look.
Industrial Look
Metal pegboard wall organizers with black or grey finishes give an industrial feel.
Colorful & Creative
Bright colors and playful arrangements work well for kids’ rooms and craft spaces.
Mixed Storage Design
Combine pegboard wall organizers with floating shelves or cabinets for extra functionality.
Budget Tips for Building a Pegboard Wall Organizer
- Buy pegboards from local hardware stores
- Reuse old boards or materials
- Start with basic hooks and upgrade later
- DIY baskets and shelves
A pegboard wall organizer can be built at a very low cost without sacrificing quality.
Common Mistakes to Avoid
- Skipping wall spacers
- Overloading the pegboard
- Using weak wall anchors
- Poor planning of layout
Avoiding these mistakes ensures your pegboard wall organizer remains strong and safe.
Maintenance and Safety Tips
- Clean the pegboard regularly
- Check screws and hooks periodically
- Rearrange items carefully
- Keep sharp tools out of children’s reach
Proper maintenance extends the life of your pegboard wall organizer.
Frequently Asked Questions (FAQs)
How much weight can a pegboard wall organizer hold?
It depends on the pegboard type, wall anchors, and installation quality.
Is a pegboard wall organizer renter-friendly?
Yes, with removable anchors or minimal drilling.
Is pegboard better than shelves?
Pegboards offer more flexibility and customization.
Conclusion
Building your own Pegboard Wall Organizer is a rewarding DIY project that improves organization, saves space, and enhances your home’s appearance. With the right materials, planning, and creativity, you can design a pegboard wall organizer that fits your exact needs.
Whether you use it in your kitchen, office, garage, or craft room, a pegboard wall organizer is a smart investment in both function and style. Start building yours today and enjoy a clutter-free, well-organized space.