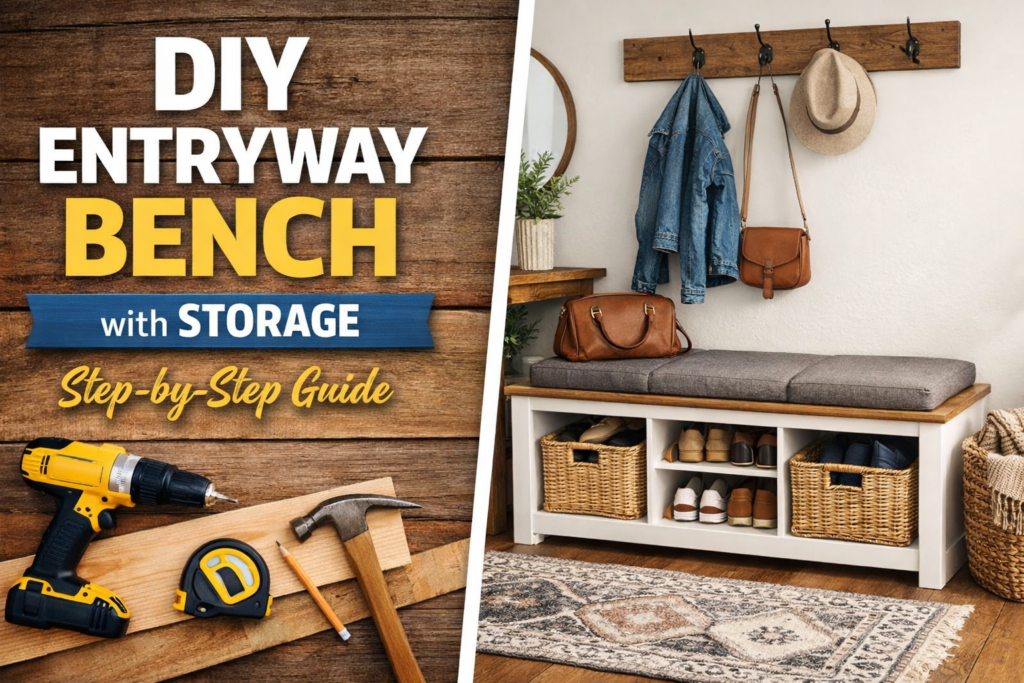
A cluttered entryway can make even the most beautiful home feel messy and unwelcoming. Shoes piled near the door, bags thrown on chairs, and keys constantly going missing are common problems in many households. The good news is that you don’t need expensive furniture to fix this issue. A DIY entryway bench with storage is a practical, stylish, and budget-friendly solution that anyone can build with basic tools and a little patience.
This detailed, step-by-step guide will walk you through everything you need to know—from planning and materials to construction, finishing, and maintenance. Whether you are a beginner or someone with a bit of DIY experience, this guide will help you build a functional and attractive entryway organizer bench that fits perfectly into your home.
Why Choose a DIY Entryway Bench with Storage?
An entryway is the transition space between the outdoors and your home’s interior. Because it is used multiple times a day, it easily becomes cluttered. A DIY entryway bench with storage solves several problems at once by offering seating, organization, and style in one compact piece of furniture.
Unlike store-bought benches, a DIY version allows you to customize the size, storage layout, and finish to match your space and décor. You can design it to hold shoes, backpacks, umbrellas, and other daily essentials while also providing a comfortable place to sit when putting on or removing footwear. Most importantly, building it yourself is often far more affordable than buying a ready-made organizer bench.
we have more storage ideas like
Minimalist Wardrobe Organization: A Beginner’s Guide to a Clutter-Free Closet
Benefits of Building a DIY Entryway Bench with Storage
A DIY entryway bench with storage offers many advantages that make it a worthwhile home improvement project:
1. Improved Organization
Shoes, bags, and accessories finally have a designated place. This reduces clutter and makes your entryway easier to maintain.
2. Space-Saving Design
By combining seating and storage, a DIY entryway bench with storage makes efficient use of limited space, especially in apartments and small homes.
3. Full Customization
You can choose the number of compartments, bench height, and storage type—open cubbies, drawers, or hidden storage under the seat.
4. Budget-Friendly
DIY projects typically cost much less than store-bought furniture, especially if you use plywood or reclaimed wood.
5. Beginner-Friendly Project
With basic tools and clear steps, this project is suitable for beginners who want to gain confidence in DIY furniture building.
Planning Your DIY Entryway Bench with Storage
Proper planning is essential before starting your DIY entryway bench with storage. A well-planned project saves time, reduces mistakes, and ensures a sturdy final result.
Measure Your Entryway Space
Start by measuring the available space in your entryway. Note the width, depth, and height where the bench will be placed. Leave enough room for doors to open and people to walk comfortably.
Decide on Bench Dimensions
A standard entryway bench is usually 16–18 inches high and 12–16 inches deep. Adjust these measurements based on your comfort and storage needs.
Choose Storage Type
Decide what you want to store:
- Open cubbies for shoes
- Drawers for accessories
- Baskets for a clean, organized look
- Hidden storage under the seat for seasonal items
Select a Design Style
Choose a style that matches your home décor, such as modern, farmhouse, minimalist, or rustic. This will guide your choice of materials and finishes.
Tools and Materials Needed
Before building your DIY entryway bench with storage, gather all necessary tools and materials.
Essential Tools
- Measuring tape
- Circular saw or hand saw
- Power drill
- Screwdriver bits
- Sander or sandpaper
- Carpenter’s square
Materials
- Plywood, MDF, or solid wood boards
- Wood screws
- Wood glue
- Wood filler
- Paint or wood stain
- Protective sealant
Optional Accessories
- Storage baskets
- Drawer slides
- Seat cushion or foam
Using affordable materials like plywood helps keep the overall cost low while still ensuring durability.
Step-by-Step Guide to Build a DIY Entryway Bench with Storage
This section explains how to build a DIY entryway bench with storage step by step.
Step 1: Cut the Wood Pieces
Using your measurements, cut all wooden panels for the bench frame, sides, top, and storage compartments. Accurate cuts ensure the bench fits together properly.
Step 2: Assemble the Bench Frame
Start by assembling the base frame using wood screws and glue. Ensure all corners are square and the structure is level.
Step 3: Add Storage Compartments
Install vertical dividers to create storage cubbies or drawer spaces. Secure them firmly to support weight and daily use.
Step 4: Attach the Bench Top
Fix the top panel securely to the frame. This will serve as the seating area, so make sure it is strong and stable.
Step 5: Sand the Surface
Sand all surfaces to remove rough edges and splinters. This step improves both safety and appearance.
Finishing and Painting Your DIY Entryway Bench with Storage
Finishing gives your DIY entryway bench with storage a polished, professional look.
Choose Paint or Stain
Paint works well for modern interiors, while wood stain highlights natural grain for a rustic feel.
Apply a Protective Sealant
A clear sealant protects the bench from moisture, scratches, and daily wear—especially important in high-traffic entryways.
Add a Cushion
For extra comfort, place a foam cushion covered with fabric on top of the bench. Secure it with Velcro or ties.
Storage Ideas to Maximize Functionality
A DIY entryway bench with storage becomes even more useful when paired with smart organization ideas:
- Shoe racks inside cubbies
- Baskets for small items
- Hooks above the bench for coats and bags
- Labels for easy organization
These additions help maintain a clean and clutter-free entryway.
Common Mistakes to Avoid
Avoid these common mistakes when building your DIY entryway bench with storage:
- Incorrect measurements
- Using weak joints or insufficient screws
- Skipping sanding and sealing
- Overloading storage compartments
Taking your time during each step helps ensure a durable and safe bench.
Maintenance Tips for a DIY Entryway Bench with Storage
Regular maintenance keeps your DIY entryway bench with storage looking new:
- Wipe surfaces weekly
- Tighten screws periodically
- Touch up paint or stain when needed
- Avoid excess moisture exposure
Styling Ideas for Your Entryway Organizer Bench
Style your DIY entryway bench with storage with decorative elements:
- A wall mirror above the bench
- A small entryway rug
- Throw pillows or cushions
- Indoor plants for a fresh look
These details enhance both function and visual appeal.
Final Thoughts
Building a DIY entryway bench with storage is a rewarding project that improves organization, saves space, and adds personality to your home. With proper planning, simple tools, and this step-by-step guide, you can create a custom entryway solution that looks great and serves your daily needs. Whether you live in a small apartment or a large house, this DIY project is a smart and stylish upgrade that you’ll appreciate every day.


This Post Has 2 Comments